You might have a nice navigation bar, but it doesn’t do any
navigation yet, and after backing out of the changes you made to the
tableView:didSelectRowAtIndexPath: method to
present a pop up, the code doesn’t tell you about the selected city
anymore. Let’s fix that now and implement a view controller and associated
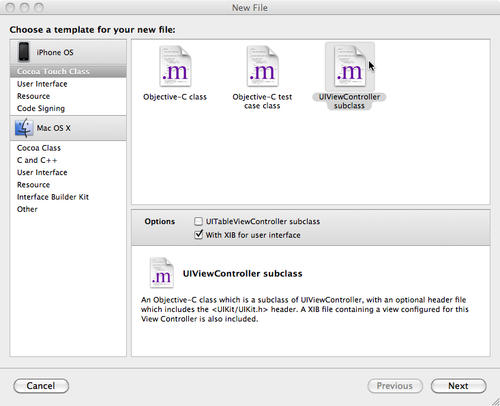
view to present the city information to the application user.Right-click on the Classes folder in the Groups & Files pane and
select Add→New File. Choose a UIViewController subclass and tick the checkbox
to ask Xcode to generate an associated NIB file, as shown in Figure 1. When prompted, name
the new class CityController.m, as this
will be the view controller we’re going to use to present the information
about our cities.
This will generate three new files:
CityController.h,
CityController.m, and
CityController.xib. For neatness you might want to
drag the CityController.xib file into the Resources
folder of the project along with the other project NIB files.
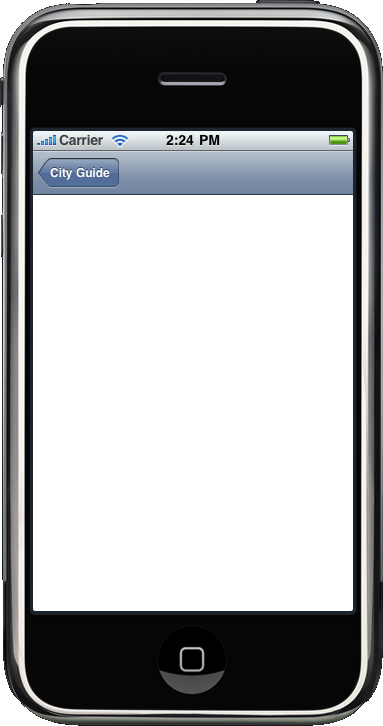
Right now, the new NIB file is just a blank view. We’ll fix that
later, but first we need to add code to the tableView:didSelectRowAtIndexPath: method in the
RootController.m class to open the new view when a
city is selected in the table view:
- (void)tableView:(UITableView *)tv
  didSelectRowAtIndexPath:(NSIndexPath *)indexPath
{

    CityGuideDelegate *delegate =
				     (CityGuideDelegate *)[[UIApplication sharedApplication] delegate];
				    CityController *city = [[CityController alloc] init];
				    [delegate.navController pushViewController:city animated:YES];
				    [city release];

    [tv deselectRowAtIndexPath:indexPath animated:YES];
}
Here we grabbed a reference to the application delegate and
initialized a new CityController
instance. We then pushed this view controller onto the top of the UINavigationController stack, making its view
the current view.
Additionally, at the top of the
RootController.m class, since we’re now making use of
the CityController class, we’ll also
need to import its interface file into this class:
#import "CityController.h"
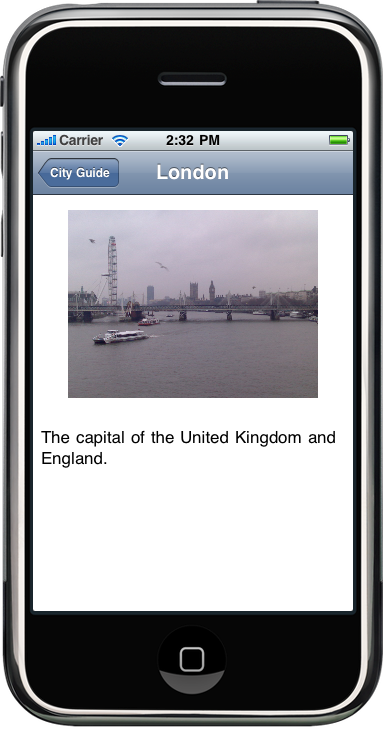
This is another good point to stop and try things out, so click the
Build and Run button in the Xcode menu bar. If all has gone well, when you
click on a city your table view should slide neatly to the left and reveal
a blank white view created by the CityController view controller, with a
navigation bar at the top and a Back button provided by your UINavigationController that will take you back
to the city table view, as shown in Figure 2.
From here we need to modify the CityController class so that we can populate its
view from the model held by the app delegate; then we need to build that
view in Interface Builder by modifying the
CityController.xib file. The first question we need
to ask, however, is “How does the controller class know which city to
display?” An easy way to make this happen is to override the init method. In the interface file
(CityController.h), we’ll declare the following
method:
- (id)initWithIndexPath:(NSIndexPath *)indexPath;
I plan to initialize the class by passing in the index (NSIndexPath) of the
selected UITableViewCell in the main table view.
From this you can figure out which City
to use to populate the view. As you can imagine, this is one of a number
of different ways to approach this problem.
In our view, we’ll be using the navigation bar to display the city
name as the view title, a UITextView
element to display the city description, and finally a UIImageView to display the picture of the city
that we added to the project earlier. The interface file therefore has to
declare these as variables and make them available to Interface Builder by
also declaring them as an IBOutlet.
Here’s what CityController.h should look like with
these changes (including the line of code just listed):
#import <UIKit/UIKit.h>

@interface CityController : UIViewController {
    NSIndexPath *index;

    IBOutlet UIImageView *pictureView;
    IBOutlet UITextView *descriptionView;
}

- (id)initWithIndexPath:(NSIndexPath *)indexPath;

@end
You’ll notice that we declared our variables as an IBOutlet inside the @interface declaration instead of doing so while
declaring them as a property. There really isn’t any need to make these
variables a property, as we don’t need accessor methods for them, and
making the IBOutlet declaration as part
of the variable declaration is perfectly fine.
Note:
Even when working with properties, you can put the IBOutlet declaration in the property’s
variable declaration instead of the @property statement if you wish (it’s a matter
of style).
I implemented the init method in
CityController.m as follows:
- (id)initWithIndexPath: (NSIndexPath *)indexPath {

    if ( self == [super init] ) {
        index = indexPath;
    }
    return self;
}
This invokes the superclass init
method and assigns the result to the self variable. If the call to the superclass is
unsuccessful, self will be set to
nil and this will be returned by the
initWithIndexPath: method. This is very
unlikely to occur, and if it does your application will crash. However,
normally our line of custom initializer code will be executed: it sets the
index variable to point to the NSIndexPath we passed into the object. We then
initialize the view inside the viewDidLoad: method.
- (void)viewDidLoad {
    CityGuideDelegate *delegate = (CityGuideDelegate *)
      [[UIApplication sharedApplication] delegate];
    City *thisCity = [delegate.cities objectAtIndex:index.row];

    self.title = thisCity.cityName;
    descriptionView.text = thisCity.cityDescription;
    descriptionView.editable = NO;
    pictureView.image = thisCity.cityPicture;

}
Inside the viewDidLoad: method we
grabbed a reference to the application’s app delegate, and then used this
and the index variable to retrieve the
correct city. Then we set the text and
image properties of the two subviews to
hold the city data, and the title of
the main view to be the city name. The title of the view will be displayed
in the navigation bar. We also set the editable property of the descriptionView to NO, as we don’t want the user to be able to edit
the text describing the city.
Since we’ve made use of both the CityGuideDelegate and the City classes in this method, we must also
remember to import them in our implementation. Add these lines to the top
of CityController.m:
#import "CityGuideDelegate.h"
#import "City.h"
Apart from the changes shown so far, the only other change to the
default CityController implementation
is to make sure we release our declared variables in the dealloc: method. Find the dealloc: method at the bottom of
CityController.m and add the lines shown in
bold:
- (void)dealloc {
    [index release];
				    [descriptionView release];
				    [pictureView release];
    [super dealloc];
}
Now we have to go back to the RootController implementation and make one quick
change: substitute the new initWithIndexPath: method for the default
init method call we originally used. In
the tableView:didSelectRowAtIndexPath:
method of RootController.m, replace the following
line:
CityController *city = [[CityController alloc] init];
with this line, making use of the new initialization method:
CityController *city =
           [[CityController alloc] initWithIndexPath:indexPath];
At this point, all we need to do is go into Interface Builder and
build the view, and then connect the view to the outlets we declared and
implemented inside the CityController
class.
Opening the CityController.xib file in
Interface Builder will present you with a blank view. Drag an image view
(UIImageView) and text view (UITextView) element from the Library window
(⌘-Shift-L) onto the view. These controls are available under Cocoa
Touch→Data Views.
Since I resized my images to be the same aspect ratio, we’re going
to change the size of our UIImageView to reflect
that. In the Size tab of the Inspector window (⌘-3), resize the UIImageView to have a width of 250 pixels and a
height of 188 pixels. Next, position it at X = 25 and Y = 37. Turning to
the Attributes tab of the Inspector window (⌘-1), change the mode of the
view to Aspect Fill. This means the image will be scaled to the size of
the view, and if the aspect ratio of the image is not the same as the
aspect ratio of the view, some portion of the image will be clipped so
that the view is filled.
Turning to the UITextView
element, use the Size tab of the Inspector window (⌘-3) to position
it at X = 0 and Y = 223 with a width of W = 320 and a height of H = 256.
This fills the main view below the image, as shown in Figure 3.
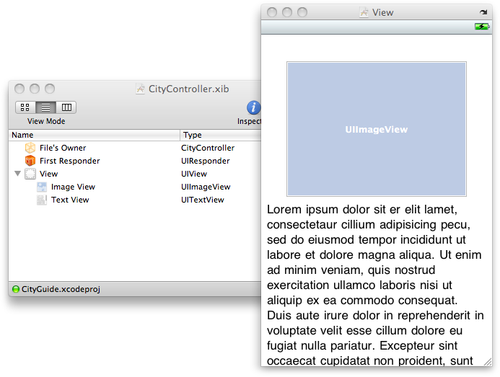
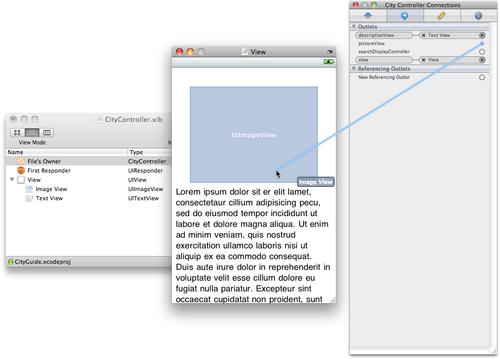
The only thing left to do is connect the UIImageView and UITextView elements to the two IBOutlet variables we created in code. In the
main XIB window (titled CityController.xib), click on File’s Owner and go
to the Connections tab in the Inspector window (⌘-2). Connect the descriptionView outlet to the text view and the
pictureView outlet to the image view,
as shown in Figure 4.
At this point we’re done, so make sure the NIB file is saved and go
back into Xcode and click the Build and Run button on the toolbar. After
the application starts tap one of the city names and you should see
something like Figure 5.